Abstract Nature : Personal Project 1

Abstract Nature: What Is Abstraction?
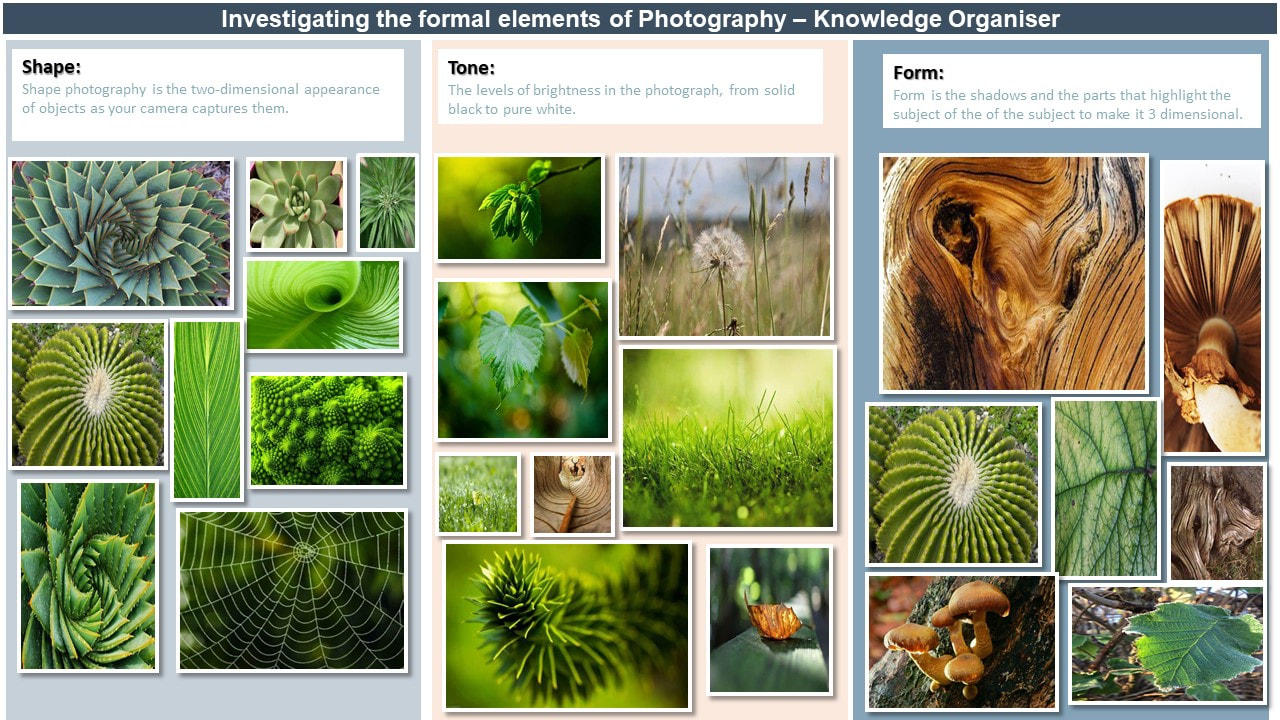
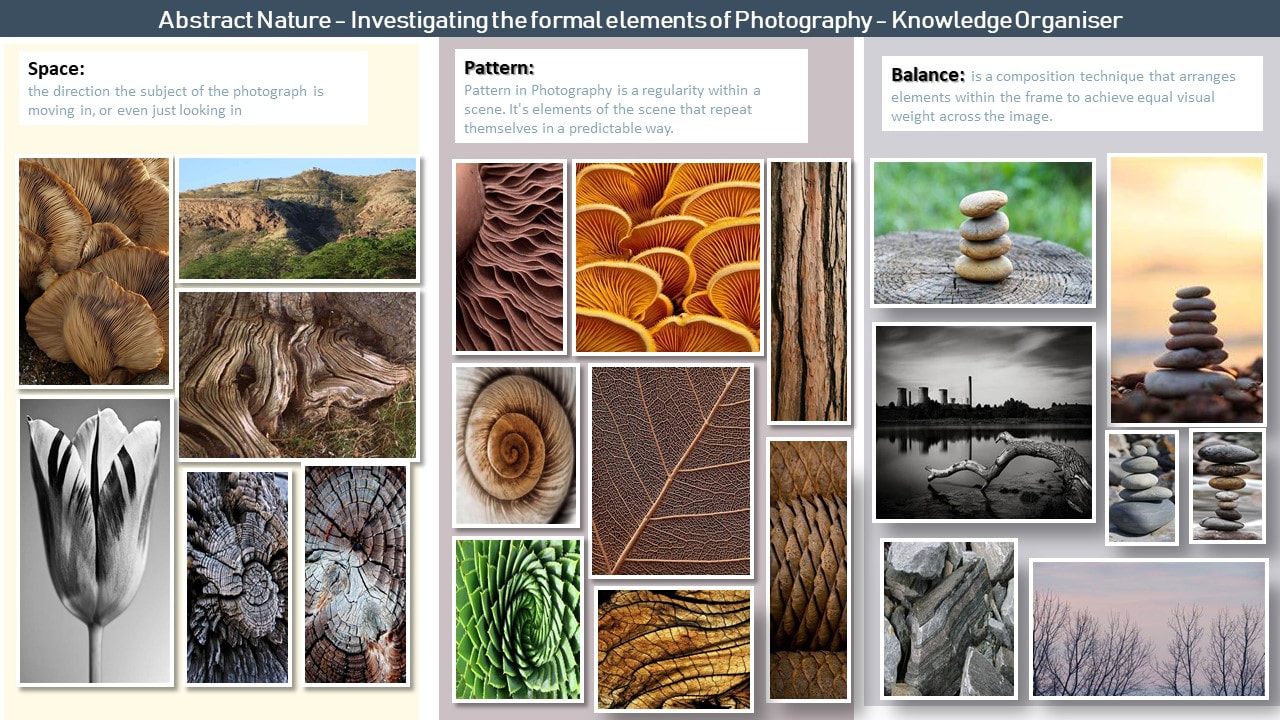
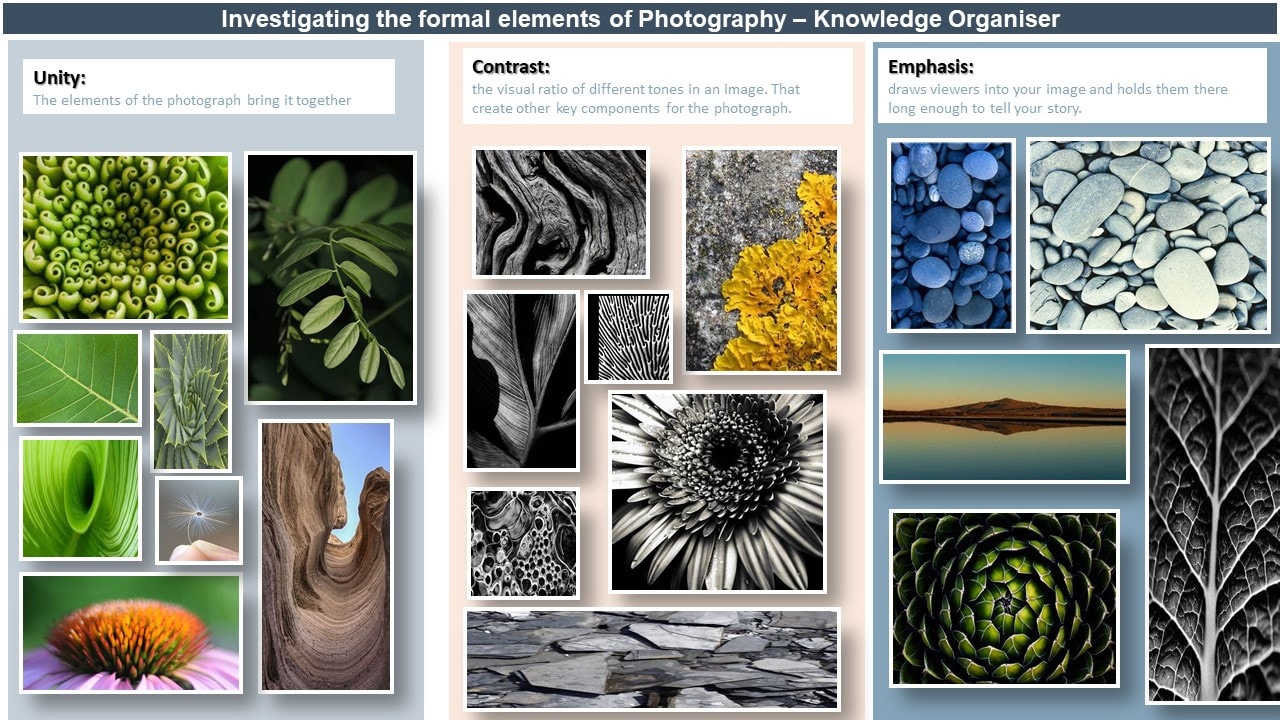
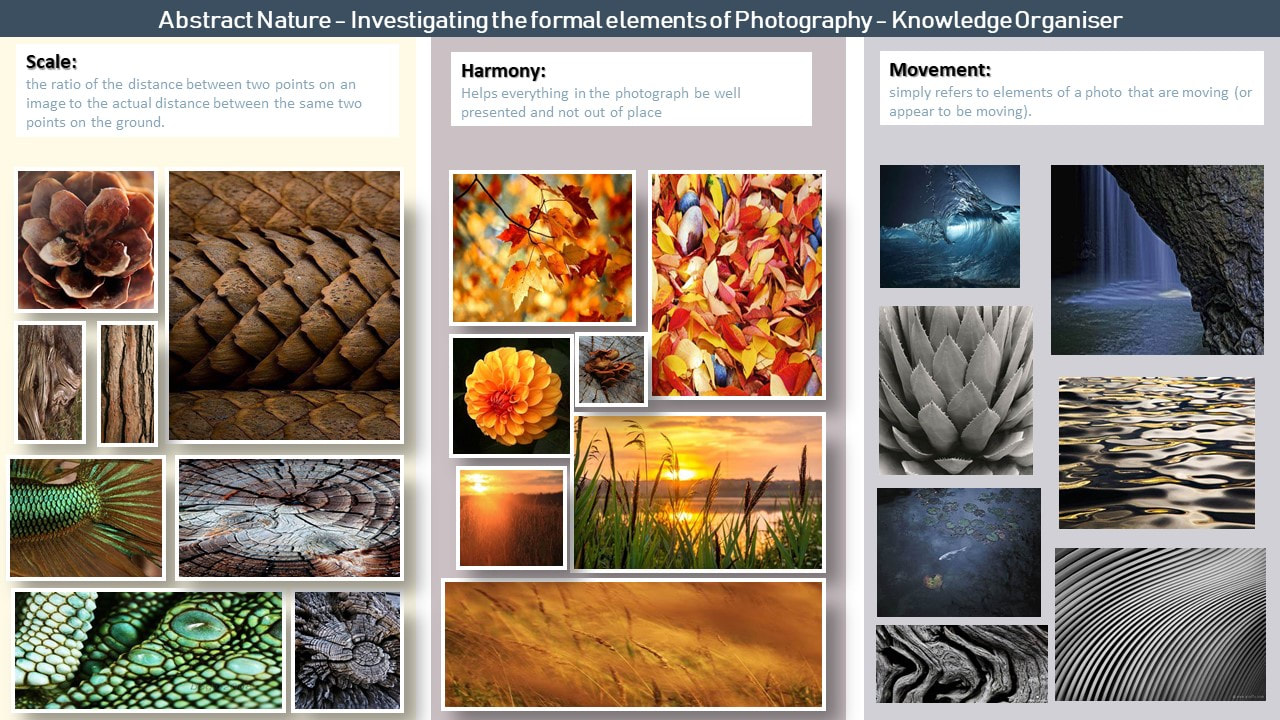
Abstract photography, sometimes called non-objective, experimental or conceptual photography, this a means of depicting a visual image that does not have an immediate association with the object world and that has been created through the use of photographic equipment, processes or materials. Below are some examples of abstract Photography that I am inspired by and some initial research into the formal elements of photography.


Intentional Camera Movement
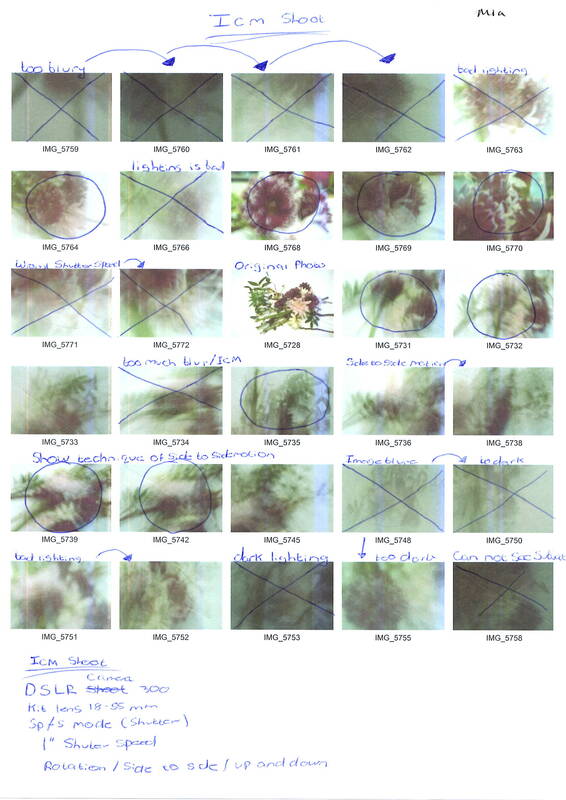


With this photoshoot I put my camera AV mode ad my shutter speed to 1 second. In that 1 second that my camera taking the photograph moved it around the different techniques I had learned. As you can see I did not use the same technique in every photograph, it varies. The first technique I used was the rotating method. In this method I rotated my camera clockwise and anti-clockwise to get swirl affect. Next I moved my camera side to side to get a more affective blur. And the final method I used was the up and down method were I move my camera up and down as fast as I can.


Monochrome Shoot


In this photoshoot we were taken outside to take pictures natural form in black and white. One thing that did not go to plan for me, is that my Cannon DLSR would not filter to black and white. After the photoshoot, I edited the photos so the would be black and white and meet the specifications of the photoshoot. while doing the photoshoot, we had to get very close to the natural form and try different angles so we would not get subjects like people and cars and backgrounds dirt and pavement. One technique I used so I would not get any additional subjects or backgrounds is pointing my camera up at the sky. I used this technique for the taller natural forms to get the main subjects and focal points in the shot and focused.


Best images

I chose this image because I liked the way the leaves folded over each other and it presented a good texture on camera and the tones also showed visble signs of contrast on the main subject of the leaves. In the editing stage I kept major changes to minimum because I did not want the original image to be ruined. A key stage in editing was filtering the picture to black and white because of my camera not being able to filter to that during the photoshoot, so it would keep to the specification of the photoshoot. I did play around with the lighting, so my main subject would be lighter and contrast more with the background because it would be more darker and not show as much compared to the main subject.

With this photograph the lighting was not as good as it could be so with a few of Pixlre editing tools the lighting was with extra features. Firstly, I filtered it to black and white and then adjusted the brightness and contrast so the main subject is brighter and contrasting with the natural form in the background such as the stems of the natural form. I played around with the temperature and tint feature so the main subject would stand out again and contrast with background and other subjects.

This photograph was different to the rest of my favourites because rather than the front of the image being the main subject the natural form in the background was more in focus. But unlike my other Photographs I adjusted the lighting level so the main subject would be darker and contrasting with the natural form surrounding it. These editing tools also allowd me to blur some of other subjects that I thought were covering the main subject in the background.

This Photograph had the same issue as the one before. But it was easy to fix. with this photograph I did play around more with the editing features. Again what I had to was to filter it to black and white. I did have higher contrast and brightness level to the rest of my photographs but this was to make the main subject of the image stand out rather than what was shot out of focus.

Depth of field shoot


These images were taken at the orchid house in Estepona, Spain. I put my camera in AV mode and after the images were shot I blured the images in editing. In the photoshoot I made sure the natural form/ flower is the main subject and the background is not caught as in focus as the main focal point. I zoomed in and out to see which was the best technique for the photoshoot and I would also close to the natural form just so that the subject was in focus and because some of the main subjects are higher than others were so to get the shallow depth of field technique I needed the natural form to be closer than it originally was.


Artist Investigation - Edward Weston
“…through this photographic eye you will be able to look out on a new light-world, a world for the most part uncharted and unexplored, a world that lies waiting to be discovered and revealed.” - Edward Weston
Edward Western was a famous photographer from the 1900's. His photographs primarily focused on natural form. I am investigating the work of Edward Western because his work is based on natural form and that is the project I am working on at the moment. Edward western was known as one of the most innovative and influential American photographers. Edward Weston's photographs were taken by a view camera as digital cameras were not invented in his time. He would develop them with film in a dark room so no white light would come through. I chose this quote because it shows that photography is not just a hobby or taking pictures on your phone but it is an art. the video below shows his best work in my opinion and what i would like to emulate in this project further on.

Below are 10 images by Edward Weston that inspired me because I think they link well with my GCSE project of natural form. These images are unique to most of the photographs I have seen. The elements of tone, texture, colour and form included in the image make the photograph what it is.


|
|
Semi - Analysis

Subject:
This photograph is called No. 30 and was created by Edward Weston in 1930. The main subject of this photograph is the pepper. Because the subjects remains still throughout the image, the genre would be classed as still life. This can also be implied by the dark and dark background. Nothing is going on and the only thing in focus is the Pepper itself. The dark and light shades in the background help the main subject of the pepper stand out and create the genre of still life. The photographer chose a green pepper originally and filtered it in black and white.

Element:
This Image shows all the elements and principles of Photography that I can see in Edward Weston's photograph "No. 30". The yellow line on the image shows the symmetry across the pepper. the pepper also displays bits of contrast. This photograph contrasts between light and dark. The red outline shows how the bottom of the pepper is lighter and contrasts with the top which is darker. The green outlines shows the tone and texture that Weston created in his photograph.


|

|

Media:
This photograph was taken from a short distance because it seems zoomed in and close up, not possible from a long distance. The main focal point of this image is the pepper because there is nothing else in the photograph but the unusual natural form of the pepper. The pepper is placed in the middle so that it is the first subject the viewers see. The lighting is place above the pepper, you can see the reflection of the light bounce of the pepper in the photograph. This photograph is taken in a studio because you can see it is placed background and not a natural one. To emulate Weston's "No.30" I will take photographs of textured and unusual fruit and vegetables.
This photograph was taken from a short distance because it seems zoomed in and close up, not possible from a long distance. The main focal point of this image is the pepper because there is nothing else in the photograph but the unusual natural form of the pepper. The pepper is placed in the middle so that it is the first subject the viewers see. The lighting is place above the pepper, you can see the reflection of the light bounce of the pepper in the photograph. This photograph is taken in a studio because you can see it is placed background and not a natural one. To emulate Weston's "No.30" I will take photographs of textured and unusual fruit and vegetables.

Intent:
Edward Weston presents the message of being unique and individual. It does this by the unusual form of the pepper that Edward Weston uses in "No.30". The texture and shape of this pepper make the peppers form. This will help me with my emulation as I will focus on the texture of the fruit or vegetable I will use. I will do this by allowing very small amounts of light hit parts of my subject (Fruit or vegetable) so that the texture and tone are present in my final photographs emulating the work of Edward Weston.
Edward Weston presents the message of being unique and individual. It does this by the unusual form of the pepper that Edward Weston uses in "No.30". The texture and shape of this pepper make the peppers form. This will help me with my emulation as I will focus on the texture of the fruit or vegetable I will use. I will do this by allowing very small amounts of light hit parts of my subject (Fruit or vegetable) so that the texture and tone are present in my final photographs emulating the work of Edward Weston.
Technical Processes / low key photography

Low key photography is one of the most challenging forms of photography, for any range of shooters. Every now and again we see photographers getting mixed up between high and low key photography.
Individual camera settings will depend on you as a photographer, this is under your control. We recommend that you start with a small F/number to take in the most light and then adjust from there accordingly.
To get the best out of your low key photograph, you need to bear in mind illumination and elimination.
Shoot Plan
|
Edward weston shoot 1
props: plant pot, fruit, vegetables plan: 1. set camera in AV mode 2. turn shutter speed up to a high setting (So not much light will get through) 3. put natural form in plant pot 4. zoom in (So no unwanted subjects will be in focus) 5. get subject in focus 6. take photograph |
Edward weston shoot 2:
props: black and white card, light box, chairs, tape, fruit and vegetables plan: 1. tape the black card to the white card (To get a more steady structure) 2. place the tow pieces of black card in a L - shape holding up by chairs 3. turn light box on white colour setting ( To get a shadow effect for the natural form) 4. place natural form in the center 5. put camera in AV mode 6. place the shutter speed at regular (To get enough light) 7. take photograph |
Contact Sheet - Edward Weston Fruit and vegetable shoot

Final Edited Images


Process


My best images analysis

This image during editing presented a lot of strengths. It adjusted well to me changing the temperature and tint and maintained brightened visible when adjusting tones and lighting levels, which I have had trouble with in the past with editing. When post - editing I used PIXLRE to adjust the size, temperature, tint, brightness, levels and contrast. Firstly I cropped the image to get background object out of the final photographs. Then I filtered the image to black and white because my camera is unable to use that filter. Then I adjusted brightness, contrast, temperature and levels so the image emulated the work of Edward Weston more. This image was taken using artificial light which was proven to be be a strength during the shoot. The artificial light on this photograph makes the pepper brighter and contrast with the dark background.

This photographs strengths came through with lighting in the editing. When taking this Photograph I moved the artificial lighting source closer to the subject to get a more brighter image. For the post - editing I used PIXLRE to adjust the size, temperature, tint, brightness, levels and contrast. This photograph did not need very high levels of editing because the brightness came through from the original photograph. Again with this image the artificial lighting was the main strength of the photoshoot process. But contrastingly to the pepper the pinapple contrasts with the background because it lighter that the subject which is darker.

The overall strengths of this photograph was in the editing stage. The photograph blended well with the high contrast and brightness level I gave. In post - editing I used PIXLRE to adjust the size, temperature, tint, brightness, levels and contrast. The editing tool that worked best with this photograph was the brightness level because it helped the subject stand out from the dark background. The artificial lighting that was used in the the photoshoot help make this image an example of low key photography. The background is dark and the subject is bright and light.

The strengths overall on this Photograph were the natural light coming through the holes of the prop of the plant pot. In post - editing I used PIXLRE to adjust the size, temperature, tint, brightness, levels and contrast. I struggled with the brightness and contrast in the editing stage because it was either to bright or to dark to see the subject. Unlike the other photographs, in this photoshoot I used natural light coming through the window to emulate Edward Weston's work. For this image I think it would have needed to be a brighter day to get the photograph the right amount of brightness.
Abstraction through cyanotypes / Anna Atkins

Anna Atkins was a photographer in the 1800's. she did not do photography in the normal way it was done back then. Her photography did not involves an actual camera at all. this process is called cyanotypes. The cyanotype process uses a mixture of iron compounds, which when exposed to UV light and washed in water oxidise to create Prussian Blue images. In modern day photographers are using the cyanotypes process to develop their photographers. It is a cheaper way to do Photography when you do not have a lot of money.


Contemporary Cyanotypes:


My cyanotypes:


How I created my different cyanotypes
For this Project I used a range of different materials to create my cyonotypes to emulate the work of Anna Atkins. Firslty I used paper for three of my cyonotypes. I started of by placing similar types of natural forms on each piece of paper and then clipped them between a piece of plactic and card, so nothing fell out. THen for ten minutes I placed them in a box with UV light, so the natural forms would print on to the paper. After that, Isoaked them under water to get any shae of yellow of the paper, so it would be blue and contrast with the white. Then I made a Cyanotype using acetate and one of my final photographs from my Edward Weston shoot. I chose to go with my pinapple because it would show better when produced on a cyanotype bacause it has a ranfge of light and dark shard rather thatn my other final images. This is very similar with my first cyanotypes but instaed of placing natural forms on the paper I placed the acetateon the paper and put it under the UV light. I did create a small fabric piece by doing the same mthod that I did on my paper cyaontype. I think My mst successful cyanotype was my paper ones because i was following the exact process Anna Atkins did when she created her cyanotypes. If I did this project again, I would create a bigger fabric sample becusae I love the way it came out but I think if I had a bigger space I would have done better
Abstraction through Photogram / Man Ray

Man Ray was best known for his pioneering photography, and was a renowned fashion and portrait photographer. He is also noted for his work with photograms, which he called "rayographs" in reference to himself. A photogram is a picture not using a camera but using different photographic material like light sensitive paper. A negative of Man Ray's Photograms are that they are only used to make a shadow effect in black and white and you can't use it in different types of photography. But it allows us to get a patterned interplay of light in the photogram.


Horst P Horst / The unfamiliar and the abstracted

Horst P Horst is an German - American photographer (1906 - 1999). Horst was an original pioneer of the 20th century and used rotational symmetry to create new patterns in his images. His work is easily recognised by his mixed use of portraiture and fashion.
My rotational Symmetry edits


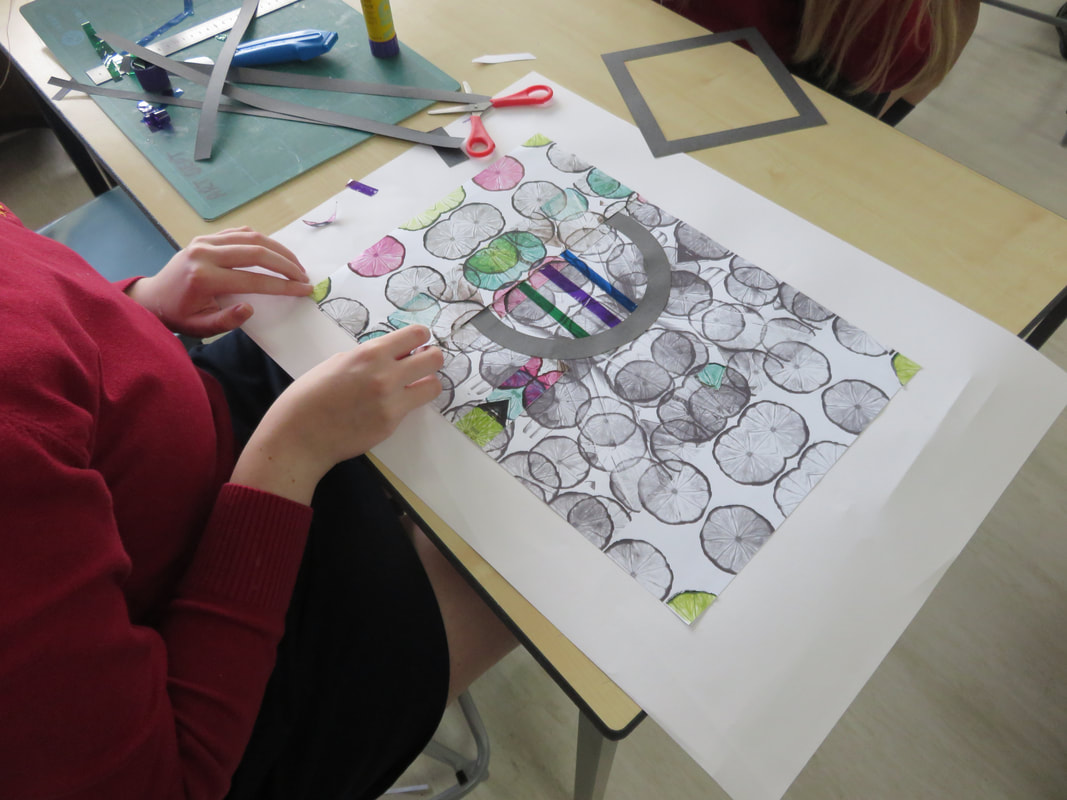
Developing My Editing Knowledge - Cyanotypes Rotational Symmetry
To develop my editing knowledge, I am combing the work of Horst P Horst and cyanotypes. to do this I will use the my original cyanotypes and duplicate it four times and create a pattern by rotating each image to create my final edit.


Technical Processes / High key

High key photography is the complete opposite of low key photography. With high key photography the image consists of no dark elements like dark light but mainly includes a subject and a bright background making it stand out. With High key photography you use a high level of overexposed lighting to let no shadow be presented in the photograph. There are many benefits to using the high key photography method, with high key photography all the elements of of the subject are exposed such as the the texture and colour. The photograph will not be over occupied with the shadow and the high key photography set up allows you to make the shadow of the subject vanish.
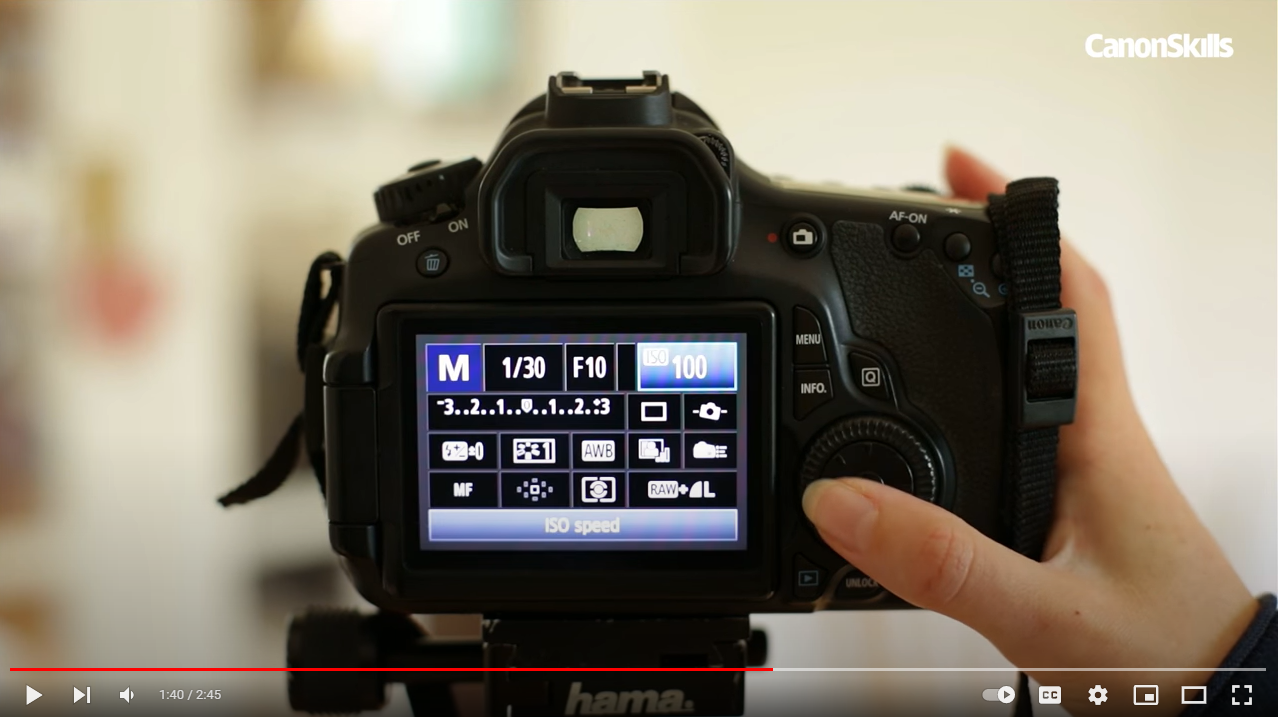
To create a high key photography image the recommended remote flash would be 1/8 power, 1/50 shutter speed, F/16 aperture and ISO 100.


Shoot Plan Diagram

|

|


Karl Blossfeldt - Shoot Plan
My high key photography shoot is inspired by Karl Blossfeldt because his work shows forms from nature in over exposed light. I have been studying what techniques are used in high key photography so I can emulate his work and photography. This photoshoot will take place in a classroom because the lighting can be controlled better and I can experiment more with the three high key photography techniques I have learned. The props I will use are textured natural forms like leaves and flowers because those subjects are commonly used in the work of Karl Blossfeldt. I will also use different types of natural form like shell and seeds because the provide line, shape and texture like presented in Karl Blossfeldt photographs. In my set up I will be using props like a white backdrop to bring the element of high key photography to my shoot. Also a combination of a soft box, perpex diffuser and remote flash so that shadows of natural form are not seen on my photographs. The camera I will be using is my Cannon DSLR and put it in setting Sepia so that it will give my natural form an ancient, old look like Karl Blossfeldt's did. For the three photoshoots I intend to have a slow shutter speed to allow more light into the camera but I will use a trip to make the camera more stable so more finer details can be captured.
Karl Blossfeldt - Artist Research
Nature educates us into beauty and inwardness and is a source of the most noble pleasure.


If I give someone a horsetail he will have no difficulty making a photographic enlargement of it - anyone can do that. But to observe it, to notice and discover its forms, is something that only a few are capable of.


Why Karl Blossfeldt?
Karl Blossfeldt is a photographer who takes photographs of singular natural form with overexposed light. This is known as high key photography. Right now I am studying the techniques of high key photography and using Karl Blossfeldt as inspiration for my future shoots on high key photography.
Karl Blossfeldt is a photographer who takes photographs of singular natural form with overexposed light. This is known as high key photography. Right now I am studying the techniques of high key photography and using Karl Blossfeldt as inspiration for my future shoots on high key photography.
who is Karl Blossfeldt?
Karl Blossfeldt was a German photographer who was known for taking photographs using the high key photography technique in the 1800's - 1900's. His photographs are taken in black and white to make the textures of his natural form stand out in final editing and this makes his work unique to other photographers.
Karl Blossfeldt was a German photographer who was known for taking photographs using the high key photography technique in the 1800's - 1900's. His photographs are taken in black and white to make the textures of his natural form stand out in final editing and this makes his work unique to other photographers.
Why this quote?
These quotes present that Karl Blossfeldt was passionate about his work and nature. These quotes show how he feels that his photographs of natural form teach and send a message to the viewer of the photograph.
These quotes present that Karl Blossfeldt was passionate about his work and nature. These quotes show how he feels that his photographs of natural form teach and send a message to the viewer of the photograph.
Why this video?
I feel this video shows all of Karl Blossfeldt best work, and how his work is still emulated in photography todat,
I feel this video shows all of Karl Blossfeldt best work, and how his work is still emulated in photography todat,
Karl Blossfeldt - SEMI Analysis
Subject:

The photographer of the photograph "Acanthus Mollis" is called Karl Blossfeldt published in 1928. The genre of this photograph is "Still Life" because the main subject of the natural form is naturally sitting still with no aspect of moving. The props I can see in this photograph are perpex diffuser to make the image high key. This photograph is called as high key photograph so there are props that are not in the framed shot such as LED light, a remote flash and two recievers on each side of thr perpex diffuser to not allow any shadow to show in the background.
Element:

Karl Blossfeldt uses a lot of key elements of photography within this photograph like texture, form, shape, line and colour. Using the technique of high key photography means the high exposure of light presents elements that can not usually be seen in photographs using natural light or dimmed light. Because of the high level of exposed light the texture of the natural form is more visual. The texture of the leaf shows the lines being more defined. The natural form has a line of symmetry down the middle, with similar qualities on each side. This natural form is a little unusual because of it's sharp and rough edged leaves but that gives the natural form more texture exposed in the photograph. The colours in this photograph are a mix of black, white and grey because with high key photography you need an overexposed white light to shine through the perpex diffuser to eliminate any signs of shadows. The balck and grey element makes the textured lines look more defined on the photograph rather than brightly coloured ones.

Line of symmetry |

No shadows |

Rule of thirds |
Media:

The main focal point of this photograph is the leaves branching of the natural form, I can tell this because the leaves are surrounding the stalk in the center in the photograph. The colours of the leaves make them destinct thn other elements of the natural form. The Acanthus Mollis is placed in the middle ground because the composition of this photograph is high key and to get the best high key effect, placing the natural form in the center of the frame will allow more light get exposed in the camera. I can see that this photograph was taken inside using overexposed lighting with light boxes and remote flash. I can see that the main sources of lighting are coming from the back of the back drop and the just infront of the camera so that not shadows can be caught on camera. The lighting angles hightlight the textures of the natural form like the dark lines of the leaves. To emulate this photograph myself, I will use my Cannon DSLR and put it in the setting sepia to give the natural forms in the photographs will look old and textured. I will use the high key photography techniques and props needed to create them to best emulate the work of Karl Blossfeldt.
Intent:
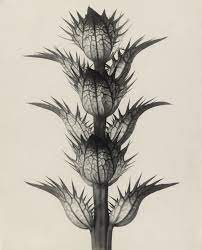
This photograph is very simple becuase the one singular natural form the is just standing natural with a plain white background. I feel this photograph conveys the messsage of simplicity because Karl Blossfeldt uses the high key photography technique which creates plain setting creating the aspect of simplicity around and within the natural form. With my own photoshoot I will put my camera in the setting sepia to make the natural form stand out and not look so plain with the white background and have the aspect of simplicity that I feel Karl Blossfeldt shows in his photograph.
|
|
My Contact Sheets:


Karl Blossfeldt - Editing

1. Crop the Tripod and Blue - tack out of photograph and make the natural form the main focal point

2. Adjust the levels of the background to make it more high key

3. Adjust the levels of the natural form to make it more vibrant against the background
My Final High Key Edits:


Developing My Work - Photofunia
To develop my work and editing knowledge, i experimented with different textures and borders to use as overlays for my original Karl Blossfeldt edits.


Karl Blossfeldt Overlays


Explosion Sketch Book / Final Outcome


Artist Investigation / Dennis Wojtkiewicz


|
How he creates his work
I use a Canon EOS 90D camera with a Canon EF 100mm f/2.8 Macro USM fixed lens. The only reason I even know about the technology is because my colleague told me that's what I needed and would be the biggest bang for the buck. The rest of it is all by feel. I have absolutely no photo training. For me that suffices because I'm not hung up on technical stuff. Just looking for ways to capture information for my paintings. (Email From Dennis Wojkiewicz) Why this artist? The final artist in the Abstract Nature project is Dennis Wojtkiewicz. This artist differs from my other artists because her is a painter but he takes photographs first with a Macro USM fixed lens because it gives the natural form extra detail that the fruit on its own. However, there are similarities in his use of his frequent use of the seven elements of art and principles of art that emulate some of the other photographers I have studied. Who is he? Dennis Wojtkiewicz was born in 1956 in Chicago and is most famously known for his paintings of fruit. Why the quote? The quote is from a direct email response from Dennis W himself. From the email, I was able understand what equipment & techniques he uses such as the lens he uses to get the detail from the natural form and how how he focuses on capturing of the detail for his photographs Why this video? This video is inspirational to me because because it shows the best of this artists work. The painting that are featured on the videos show the detail and colour that has been put in by Dennis Wojkiewicz. The paintings show harmony by the colour mixing well together and by the artist not contrasting between warm and dark colours as frequently as other photographers and artists do. |


Photographic Techniques / back lighting fruit

backlighting is the process of illuminating the subject from the back. Backlighting photography is very beneficial because it highlights the depth behind the subject and gives it a better sense of place. To create a successful backlit fruit photograph it is best to have subject with translucent fibres in it for the best chance for light to come through. Find a clear object that will allow the subject to sit on it while the light from a strong light source to travel through. Use a tripod to balance the camera and not allow any movement because the shutter speed will be set to a low one to let as much light as possible travel through the fruit to the camera.
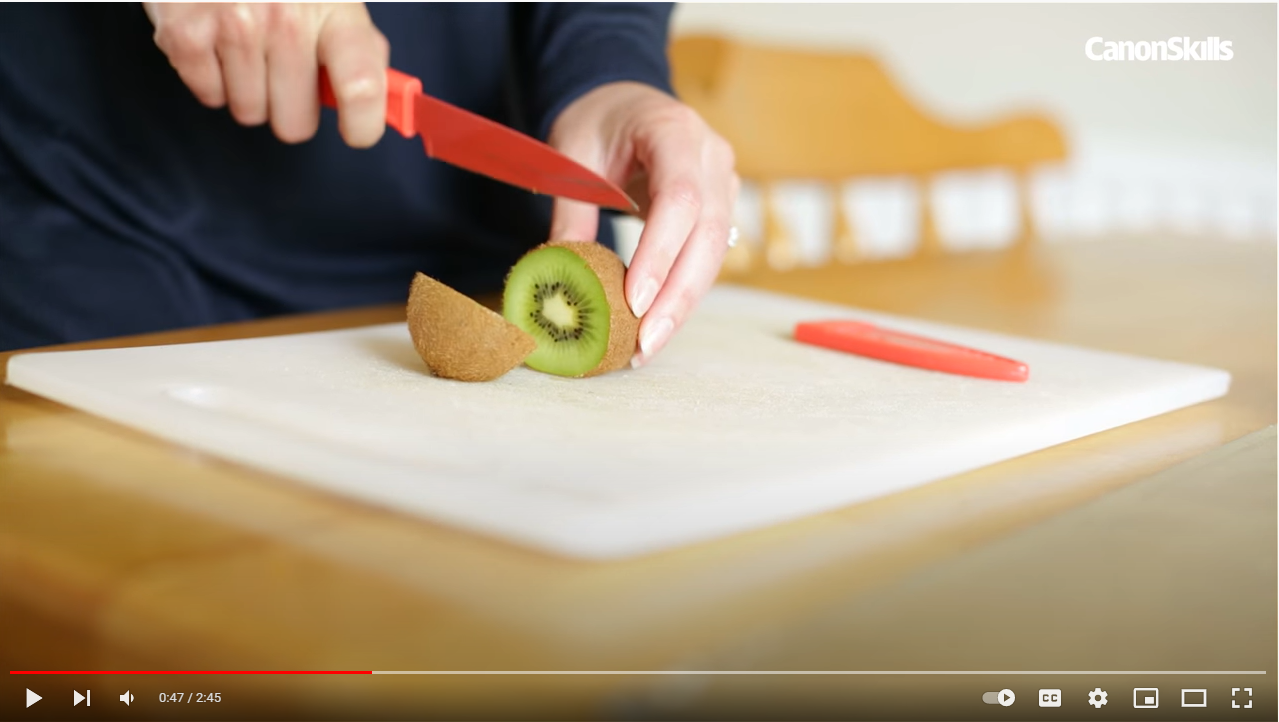
slice your fruit evenly and thinly so that your subject gets exposed with light through the transparent fibres.
|
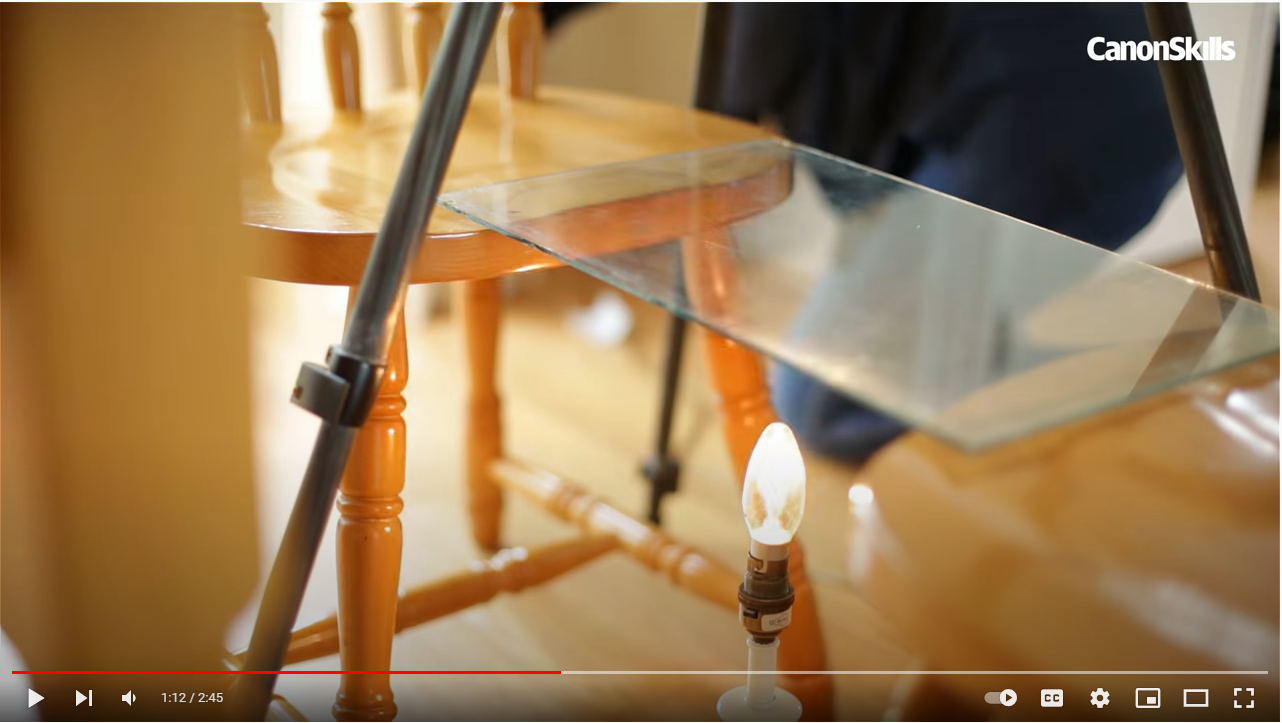
place your subject on the transparent surface and place the light source underneath to expose light through the fruit.
|
Place your camera on a tripod for your photographs to be in focus and tilt so it is facing the subject and the set up.
|
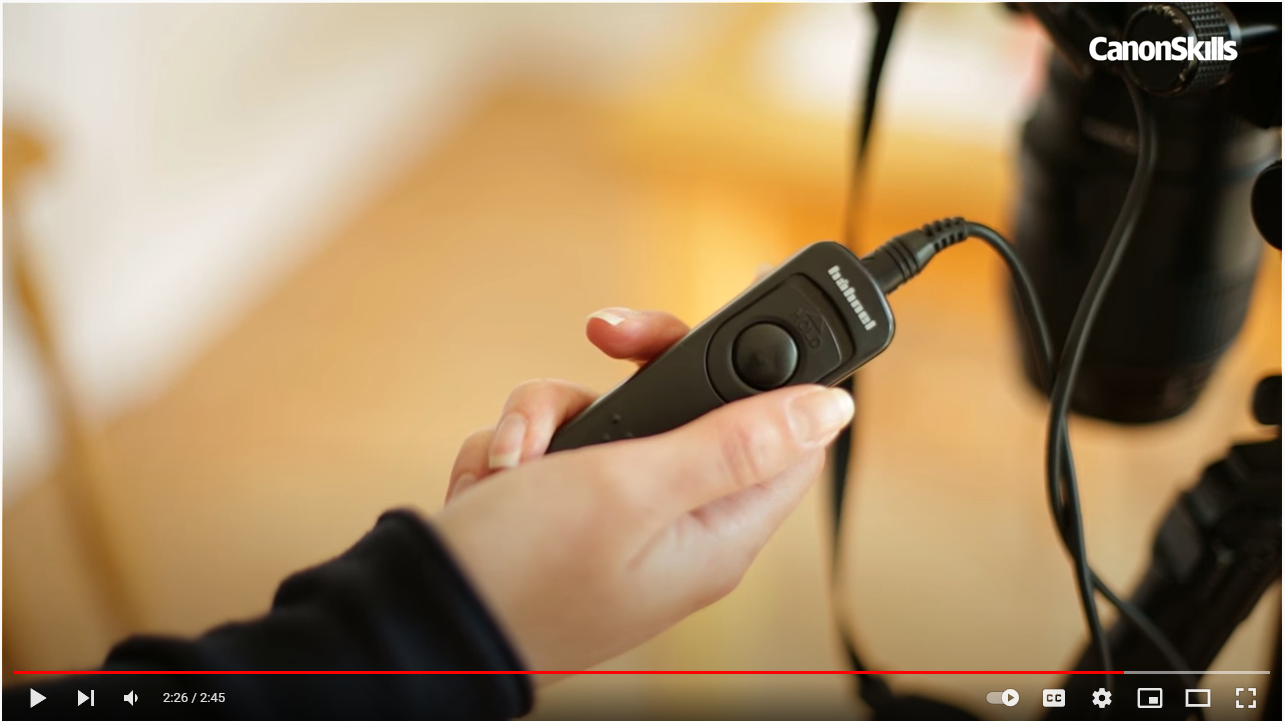
Turn your lighting source on underneath the subject and take multiple photographs of your fruit.
|

Shoot Plan
For this shoot I will need a range of fruit with transparent fibres (Subject), I will need a strong white light source, a transparent surface to hold the subject above the light source (Glass from inside a picture frame) and two chairs to balance the transparent surface above the light source. Firstly, cute a thin slice of fruit to make sure the light will be exposed enough in the photograph and then place in the centre of the transparent surface. Then, place the light source directly underneath the subject and diffuse the light with tracing paper the photograph will not be over exposed. After that, place camera onto the tripod for a more steady photograph. Then, adjust the tripod so that the camera will be facing downwards onto the fruit. Finally take a range of photographs with a range of fruit.
Post Editing /Dennis Wojtkiewicz
Editing step 1:
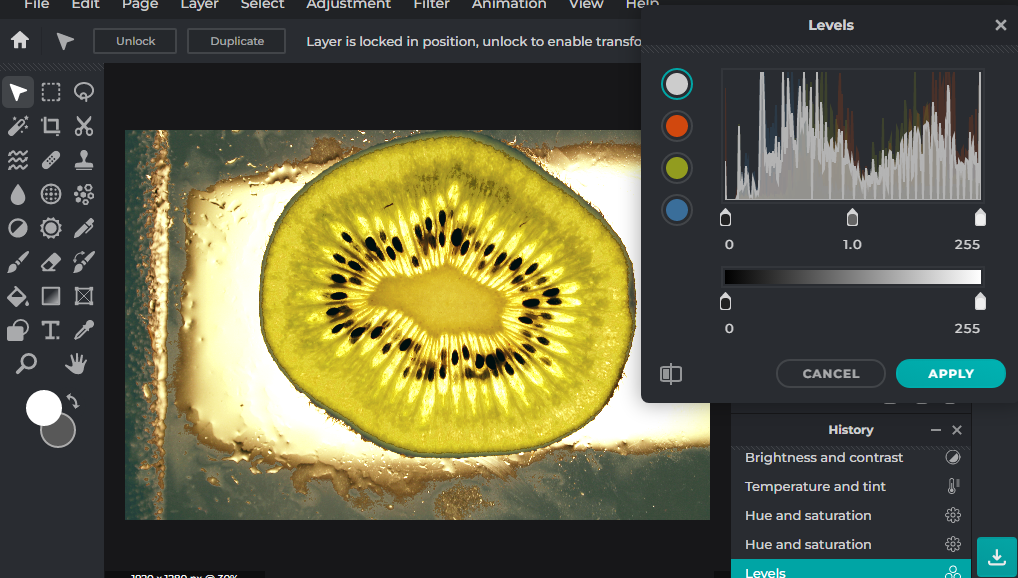
Firstly, I adjusted the temperature, tint, brightness, saturation and contrast so that the lighting source can be more seen through the transparent fibres of the fruit. By doing this I was able to expose my fruit and show small details. |
Editing step 2:
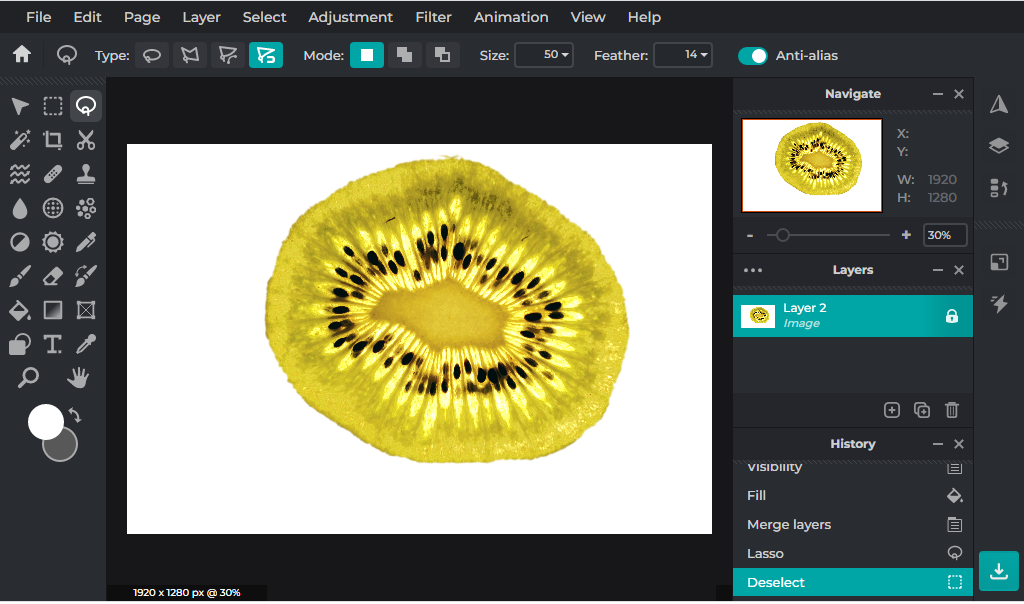
I removed the background from the original photograph which was a clear material that was used to allow more light to be exposed. To make sure the edges of the Kiwi were not rough I increased the feather tool to 14 to get less rough edges. After that I added another layer to be the background chose a of white to allow the subject to stand out. |
Editing step 3:
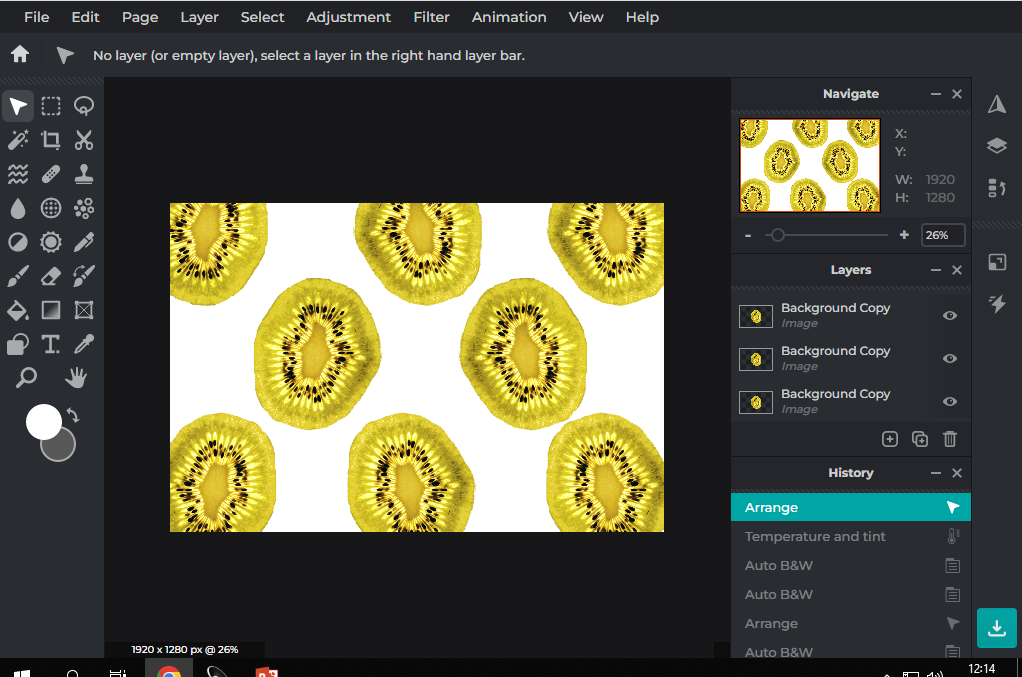
To make a pattern, I added more layers by duplicating the subject multiple time and arranging them in a regular pattern to try and fill up the white background |

Editing step 4:
To add a contrast between some of the subjects, I changed the colour for more vibrant exposure and less vibrant exposure. Firstly, I changed three of the subjects to black and white so the remaining subjects could stand out better. Then I adjusted the saturation on two of the subject to add more contrast to my edit. |
Rotational Design / Dennis Wojtkiewicz
To create these edits, I used rotational symmetry inspired by the work of Horst P Horst. On Power Point, I took the original photograph that I edited on Pixlr E and duplicated it four times and arranged them in a regular pattern. I repeated this process again but flipped the images so that the vibrant colour subjects would be in the centre. For my final rotational symmetry edit, I cropped down the original edit and focused on a small part of the photograph and duplicated that four times again and arranged them in a regular pattern like with the first two.
Edit 1:


Edit 2:


Edit 3:


Abstract Nature / Final Evaluation
Throughout this photography project I have had strengths and weaknesses during each exploring different photographers and photoshoot. Some elements that were used throughout this project that I would change if I were to do any of the photoshoots and post - editing again to get a better outcome. From this projects I have learnt important and useful skills that I can use for other projects in this photography course.
Throughout this project each shoot and each artist we researched I have learned very important skills that will be very important in future projects in photography such as high and low key photography techniques. An example of a skill i have learnt that I have used multiple times throughout this course is rotational symmetry which I used in post - editing with photographs from my monochrome photoshoot and my cyanotypes inspired by Anna Atkins. This skill allows my photographs to become more abstract and hasve a different form than it originally was taken in. When I have done rotational symmetry editing I primarily use PIXLR E but for the final photoshoot, I edited the original photographs on PIXLR E but took the edits and rotated them on Power Point. As well as rotational symmetry another skill which I feel is important in this photography course is high key photography because it allows the finer details of the subject to be over exposed and presented very well on the photograph. There were three different ways in which I achieved to get the high key photography technique including backdrop direct technique, aerial photography and remote flash backlit technique. These different high key photography techniques also allow no shadows to be exposed in the final photograph and make the main subject stand out more. Another important photography skill is cyanotypes inspired by Anna Atkins. Cyanotypes is classed as an important photography skill to me because it is a skill were you do not need a camera to create this type of photograph. To create a cyanotype you need to paint a piece of paper and place one or multiple types of natural form and clip it between one clear surface and one solid surface to make it secure. Then place it inside a dark area like a box and place a strong light source on top and wait ten minutes. Then the natural forms are printed on the paper creating a cyanotype without using any type of camera.
The first artist I researched was Edward Weston, to explore the technique of low key photography. I inititialy researched the work of Edward Weston because he is very well known photographer for using the low key photography technique especially for his photograph of a unique pepper No.30. Through studying this artist, I was able to explore concepts of line, shape and harmony in my own photography examples. From doing my semi analysis, I explored the different elements of art that that appear in Edward Weston's No.30 like symmetry, tone and texture, learning how I will emulate it in my photoshoot. Inspired by their work, I created a series of emulations by limiting light factors around me in my first photoshoot for example placing my subject (peper or brustle sprout) in a plant pot to under expose the light in the photograph. In the second shoot, to under expose the lighting I made sure there was no natural light source in the room and made plain black background and placed a dim artificial lighting source so that subject can still be seen slightly pon camera. Their work helped me understand the theme of abstract nature by Edward Weston's most famous photograph (No.30) being oddly formed peper in under exposed lighting meaning it does not have specific idea of what it could be. I think Weston does this very well because he uses the low key photography technique which does not highlight many features of the subject creating the idea of abstraction.
Anna Atkins is a well - known photography known for creating the cyanotype. Initially I researched the work of Anna Atkins because her work is primarily used with natural forms. She is known for printing different types of natural forms (Flowers and leaves) on to paper and fabrics without using a camera. Through studying this artist, I was able to explore concept of line, shape and harmony in my own photography examples. Shape is used by the unusual forms she creates by combining different natural forms together while creating her cyanotypes and also line is another element that Anna Atkins uses when she creates her Cyanotypes because some of her cyanotypes contain natural form with finer details which often contain the element of line. Inspired by their work, I created a series of emulations by placing different types of natural forms on paper and exposing them with a bright light soures to prints the natural forms onto the paper. Their work helped me understand the theme of abstract nature by when I emulated Atkins work I combined multiple different types of natural forms like flowers, leaves and stems to create an unusual form on the final cyanotype that has no final idea of what it is.
Karl Blossfeldt is a well - known photography who primarily uses high key photography in his work. Initially I researched the work of Karl Blossfeldt because his work is primarily known for the over exposure of light. He also uses natural forms as the main subject for his photographs which relates to the theme of this project. Through studying this artist, I was able to explore concepts of line, shape and harmony in my own photography examples because of the uses of high key photography Karl Blossfeldt work the finer details are presented showing details including line and shape. Inspired by their work, I created a series of emulations by creating three different shoot using the high key photography technique such as backdrop direct technique, aerial photography technique and remote flash photography technique that help no shadows to appear on the white background just like Karl Blossfeldt's photographs. All three of these shoots helped emulate the work of Karl Blossfeldt because the over exposed light helped the details of the subject of the natural form more vibrant and visible. Their work helped me understand the theme of abstract nature by me exploring the finer details on natural forms and explore how to adjust the lighting on my photographs in specific areas.
Dennis Wojtkiewicz may not be a photographer but before he paints his paintings he take photographs of the fruit he paints to get the finer detail of the fruit so that he can emulate those details in paint form. Initially I researched the work of Dennis Wojtkiewics because his work shows the finer details of the fruit in which he photographs. Through studying this artist, I was able to explore concepts of line, shape and harmony in my own photography concepts. Line is the main element of art that comes through mine and Dennis Wojkiewics because the fruit he uses has transparent fibres such as fruits like kiwis and limes which help show the finer detail when the light source is being exposed. Inspired by their work, I created a series of emulations by over exposing a lighting source through the transparent fibres so the details of the fruit are very visible. Their work helped me understand the theme of abstract nature by this particular photographer focusing on the details that are included in the natural form he uses. this links in with our theme on abstract theme because unlike some other photographer's like Edward Weston, Wojtkiewicz he exposes the light to focus on the finer details.
From this project, I feel my most sucessfull skill was using the high key photography technique. I learned this skill because two of the photographers and artists we have studied use this technique in their work (Karl Blossfeldt and Dennis Wojtkiewicz). This photography technique requires a high exposure of light so than there are no shadows appearing in the background and also shows details like transparent fibres and elements like line and shape are exposed. When I emulated these two artists work, I think these were my most successful photoshoot. Also in the post editing process, I also found it easier than in other photoshoots because adjusting the brightness made the photograph more pleasant looking.
However, I struggled with the low key photography technique inspired by Edward Weston. When we did this shoot the subject that I used would not be seen as well because of the low exposure of light in the room we did it in. I also found that some of my original photographs were not in focus as much as I would have likes. In the post editing, the process was nto as easy as in my other post edits because I had to adjust the brightness, contrast, temperature because the majority of the photographs were under exposed in lighting sources and I had to make them more visible.
My Final Outcome For Abstract Nature

